Friday, November 16, 2012

Sour Dough Stone-Ground Beer Bread

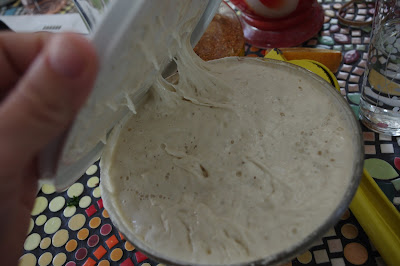
The breakthrough in my efforts to learn how to bake sourdough bread came with a perfect storm, so to speak.  There was actually a storm front moving in, but it was warm and sunny last Saturday. This apparently made my sourdough starter really happy, and it doubled, bubbled and foamed right out of the bowl.  I suppose that was all the encouragement I needed to start experimenting. I also had half a growler of flat ale in the fridge that didn't get consumed in the traditional way, and I couldn't bear throwing it out.  So I wondered if magic could be made if I combined flat beer and sourdough starter...if maybe there would be a fermentation party with gifts of fluffy, tasty loaves of bread.  I googled.  Sure enough, this sort of thing had been tried before.  I found a simple dairy & egg free recipe, but it called for 1/2 cup of sugar.  I substituted 1/4 cup of honey (thinking I didn't really want cake, but rather something nice to toast), and I also added 1/4 cup of canola oil to the recipe that had no added fat.  It was pretty good, but still a little too sweet for me.  The texture was perfect though.  It rose beautifully, was not too chewy, and had a nice, soft crunch when toasted.  In my next try with this recipe, I used black strap molasses instead of honey and added 1 tsp of salt.  It was positively perfect.  That's the one I'm sharing below.

Other notes I have are about flour and beer.  I used Highland Gaelic Ale for this recipe, but I think it would be exceptionally good with a tasty porter or stout.  If I can manage to not drink all of the Chocolate Stout from the local brewery. I might try that one next.  As for flour, I have 6 kinds of wheat flour in my house at the moment.  I have not experimented baking this recipe with all of them, but I do think half of what is good about this bread is the locally grown and milled Stone Ground Whole Wheat from a local farm. Freshly milled flour has a distinctive advantage in baking, as it still has the natural oils present and the texture and flavor is more complex.  It does, however, have less gluten, so it's necessary to combine it with a white bread flour or straight vital wheat gluten if you want the loaf to hold together.

So here it is...my first successful sourdough bread recipe:

Ingredients:
1-2 cups sourdough starter (proofed, doubled and bubbly)
3 cups stone ground whole wheat flour (Sonrisa Farm Flour, if you are shopping locally)
2 cups unbleached, un-bromated white bread flour, plus extra for dusting the board while kneading
2 tsp kosher salt
1/4 cup canola oil
1/4 cup black strap molasses
About 2 cups of flat brown ale, porter or stout


Method:
The day before you want your fresh loaf of bread, wake-up your starter by feeding it some flour and water and leaving it on your kitchen counter (covered) for at least 8 hours, but preferably 12.  Then before you go to bed, prepare the bread dough for the first rise.  (Of course, if you are a night owl or like to bake at 3am, I suppose you could alter this schedule to suit your needs.)

Mix together the flours and salt in a large mixing bowl.  Add the canola oil, molasses and 1-2 cups of sour dough starter.  Gently begin to mix everything together with your hands or a wooden spoon while slowly adding 1 1/2 cups of the ale.  When all of the flour has been folded into the dough, you can begin kneading. The dough will be heavy and somewhat dense, but if it feels dry and cracks you can kneed in a little more ale until the dough feels flexible but not sticky.

Kneading a bread dough seems to be a matter of preference.  I won't tell you how to knead your dough, because I've seen people make the same kinds of bread with completely different techniques.  I don't know much, but it seems to me that if you stretch and press in your favorite way, and do that until the dough feels fairly elastic, it's going to turn out just fine.  It takes me about 5-10 minutes of kneading to get this dough to a fairly even texture.  I form it into a neat ball.  Oil a large glass or ceramic bowl and place the ball of dough in the bowl, then flip it so that both sides have a coating of oil.  Cover lightly with plastic and leave overnight.

The next day, when you wake up, the dough should be doubled in size, but leave it longer if it needs to grow a bit more.  Oil two loaf pans with canola oil. Punch the dough down, divide it, and knead each loaf for about 5 minutes.  Form each into an oval and place in the loaf pans for the second rise.  Make cuts in the top of the loaves with a sharp knife and spray or brush the tops with oil.

Cover loosely with plastic and set in a draft-free part of your kitchen to rise.  This may take 2-3 hours, but the dough should rise about 1/2 inch above the tops of your loaf pans when it's ready to bake.  If you are using glass pans, you will also see larger bubbles forming in the dough.

Preheat oven to 375 degrees.
When the loaves are finished rising, remove the plastic and place in the center of the preheated oven.  Set your timer for 40 minutes.  Adjust time as needed, but the bread is ready when they are golden brown on top and have a hollow sound when tapped.  Remove from pans immediately and place on a cooling rack.  Slice when the loaves have completely cooled.

Thursday, November 17, 2011

Moroccan Spiced Butternut & Red Lentil Soup


I would like to quote a good friend who, after eating this soup on my birthday, said, "I must, have to, can't do without the Moroccan stew recipe. I ate it and it took me back some place that I can't remember where... but it was so good I need another fix already."
Thanks for the compliment AG! I have to admit, I thought it was pretty good too.

Ingredients:
One large butternut squash
Moroccan spice blend
1 1/2 cups red lentils
3 leeks
3 cubes of Rapunzel vegan vegetable bouillon with sea salt & herbs
a 3-inch piece of fresh ginger, peeled & grated (chopped fresh lemongrass is also nice if you can find it)
5-6 cloves of garlic, minced
1-2 cups of diced tomato
1 bunch of fresh cilantro
Juice from 1-2 lemons

Moroccan Spices:
This is basically the same as the Ras-El-Hanout blend on Epicurious.com, with a few minor changes. Whisk together spices that are already ground, or use whole and grind in a clean coffee grinder or spice grinder. Keep in mind that you may need less of the spice blend if the spices are freshly ground.
1 teaspoon cumin
1 teaspoon salt
1 teaspoon black pepper
1 teaspoon fenugreek
1 teaspoon turmeric
1/2 teaspoon cinnamon
1/2 teaspoon coriander
1/2 teaspoon cayenne
1/2 teaspoon allspice
1/2 teaspoon cloves

Method:
Preheat oven to 375 degrees. Peel, seed & cut the butternut squash into cubes and place on a baking sheet. Toss with some oil and sprinkle some of the Moroccan spices over the cubes and roast in the oven until the tips begin to turn dark brown.

Meanwhile, trim the green parts from the leeks and chop the tender white parts. Place in a large soup pot with some oil. Cook on medium-high heat until tender. Add the garlic, ginger, stock cubes, lentils, and 2 tablespoons of the spice blend. Stir until combined, then add 8-10 cups of water. Stir occasionally. Allow to boil a few minutes, then reduce heat, cover and simmer until lentils are very tender. When the lentils are cooked completely, add the cooked butternut squash. Remove from heat and let cool enough to puree safely, either with an immersion blender or standard blender. Puree the soup until smooth.

Return the soup to the heat & warm through. Stir in the diced tomato, chopped cilantro and lemon juice. Add water if too thick. Season with more salt or spices to taste.


Thursday, October 20, 2011

Grilled Corn On The Cob

Dinner tonight was sauteed collard greens, grilled corn on the cob, and fried plantain. The plantain was a little dry and floury so I made a quick vinaigrette from canola oil, honey, salt and a Sparrow Lane walnut champagne vinegar and let the plantain soak in it for a few minutes. My two year old thought it was potato. He ate it, so I didn't bother correcting him. It's a little unusual for me to make dinner without an obvious protein like beans or meat, but I had nearly 30 ears of sweet corn and 8 bunches of greens from the farm this week. No one seemed to miss the beans and meat. As a matter of fact, it was my two year old who sat...no, was standing in his chair eating his first ear of corn as fast as possible. He helped himself to a second, and then a third.

It's not complicated. All I do is light the gas grill & let it get nice and hot. I put the corn on the grill with the silks and husks completely intact. Do not shuck the corn before cooking, and do not wrap in foil or anything else. There is moisture in the husks and silks that help the corn to cook in the dry heat of a grill, while also imparting amazing flavor from the smoky husks.

Replace the cover of the grill and let them cook for about 10-15 minutes. When one side is black, turn the corn & let it get black on the other side. When you remove the corn from the grill you can shuck it right away if you have tough hands, but it will be quite hot so take care. Let it rest if you would rather not risk burning your hands. The husks & silks should peel away easily. Serve salted & buttered, or without anything.

Monday, October 10, 2011

No Cheese Pizza


Why would I make pizza without cheese, you ask? Well, because it is so amazingly tasty. And also, no matter how you slice it, cheese is just not on a low saturated fat diet. That does not mean we don't eat it sometimes, but how about a pizza that is so delicious without cheese that you don't even miss it? And there are loads of people who can't or don't eat cheese for various reasons, so I figured it was worth writing about.

Let's start with the crust...
1 1/2 cups all purpose flour
1 1/2 cups whole wheat flour
3 tsp granulated yeast
1 Tbs sugar
1 tsp salt
2 Tbs olive oil
1 cup room temperature water
Put all ingredients in a bread machine and put on dough setting. Or, mix all ingredients and knead gently. Let rise two or three times (kneading between rises).

Set oven to 400 degrees F and place pizza stone in the oven. Once the dough has had a chance to proof two or three times, roll out on a board to the size of your pizza stone (or toss in the air if you want to make the kids laugh). Place the dough on the hot stone and brush with some olive oil. Return the dough to the oven for about 15 minutes or until the dough has risen and is dry to the touch. Bake longer if you want a crispier crust.

The Toppings...
To save time, most of these can be made ahead and refrigerated
.
Fresh marinara (see below)
2 onions, sliced & sauteed in oil until caramelized with a splash of white balsamic vinegar
8 oz baby bella mushrooms, sauteed in oil & red wine.
Olives (optional)
Fresh spinach, chopped
Avocado, sliced
Marinated heirloom tomato slices (see below)

To make the marinara, saute 2-3 garlic cloves in oil and before they brown, add crushed tomatoes, tomato paste, herbs De Provence, 2 bay leaves, salt, olive oil & red wine. The quantities don't really matter that much, just don't make it too watery. Taste it to make sure it has the right balance. You can add a little honey, basil or balsamic vinegar if you like it sweeter. Simmer, stirring occasionally. Remove from heat. This can be made ahead of time & refrigerated. Extras can be frozen in small containers for the next time you make pizza, or used as the base for a pasta sauce.

To marinate the tomatoes, use thick slices of white, orange, yellow or pink heirloom tomatoes. Place in a bowl with salt, olive oil, white balsamic vinegar and herbs De Provence. Let soak overnight. Place the tomatoes in a colander before assembling on the pizza. You can save the juice for a salad dressing or sauce.

Assemble the pizza with the toppings in the order they are listed. Bake at 400 degrees until the spinach is wilted and the crust begins to brown on the edges. You are going to love this.


Saturday, September 17, 2011

Baba Ghanoush


Most recipes for this middle eastern dish suggest removing the skins of the eggplant. I happen to think vegetable skins are the best part, so why-o-why would you put them in the compost when you can enjoy the flavor and nutrients?

3 medium eggplant
3 cloves garlic, minced or pressed
4-6 tablespoons of sesame tahini
3 tablespoons extra virgin olive oil
Juice from one lemon
1 bunch cilantro, chopped
Sea salt, cumin, cayenne pepper or paprika to taste.

Cut eggplant into large chunks and place on a baking try. Generously toss with olive oil and sea salt. Bake at 375 degrees for about 30 minutes, or until the eggplant is soft and beginning to brown, but not dry. Transfer to a bowl and let cool for about 10 minutes. Use kitchen shears or a knife to cut the skins smaller if desired. Add the rest of the ingredients and combine with a pestle to mash them together. This method allows the flavors to remain bold and the dish will have a heartier texture. Serve warm with pita, toast, naan, or as a sandwich spread.

Wednesday, September 14, 2011

Chocolate Orange Zucchini Bread


Ingredients:
1 1/2 cups whole wheat flour
1 1/2 cups all-purpose flour
3/4 cup good quality non-dutched cocoa powder
1 tsp cardamom
2 tsp cinnamon
1 tsp salt
2 1/2 tsp baking powder
1 1/2 tsp baking soda
1 1/2 cups sucanat

3 eggs
2 tsp vanilla
1/2 cup fat free buttermilk
1/2 cup canola oil
3 cups grated zucchini
Zest from 2 or 3 oranges

1-2 cups chocolate chips
1-2 cups chopped walnuts

Method:
Grease two loaf pans. Pre-heat oven to 350 degrees.
Combine dry ingredients in a large bowl. In a separate bowl, combine wet ingredients. Mix together with a wooden spoon until well-blended. It should be a thick batter, so if it is too dry, add more zucchini. If it is too wet, add more flour. Stir in the chocolate chips and walnuts, then fill two 4x9 inch loaf pans (about 3/4th's full). Bake about one hour, or until done in the center. The top will crack and a skewer inserted into the center will come out with a few crumbs, and possibly some melted chocolate from the chips. It may take an hour and a half to cook through.

Thursday, August 18, 2011

What I have to say about Saturday morning waffles...


A good friend asked for my waffle recipe about two months ago. Sure, I said. I'll pass that along. It's easy. It really is easy. Except for the fact that every time I make waffles they are slightly different from the last. "So what do I write down?" I kept thinking. Which recipe should I post?? I don't know...maybe I'll just tell it all. This might be really dull reading, but I'll make my best effort to pass on the 'how-to' for the number one comfort food in our house. Here's the best part...they are actually kind of good for you. It's packed with whole grains, nuts, fruits and the fats are heart-healthy and rich in omega-3's. Also, it's great to get the kids involved in measuring & dumping the ingredients together. This is a great recipe for an 'all hands in the kitchen' meal.

Waffles are so forgiving, I'm not sure if I can even call this a recipe. But here is the basics for a large batch of 15-20 waffles. (We make a lot so we have leftovers for quick breakfasts or snacks later in the week.)
4 cups of flour (I mix whole wheat, unbleached white, oat and buckwheat flours in equal proportions, but you can really use anything you like or have on hand...just not self-rising) For added texture or nutrition you can add a few tablespoons of flax meal, wheat germ, corn meal, or cream of wheat.
2 tablespoons of baking powder
1-2 cups ground walnuts, almonds or pecans
1/2 cup canola oil
3 eggs
fat free buttermilk
2-3 bananas, mashed or cut into chunks
You can also use grated zucchini or pureed cooked carrots instead of bananas. If you like chunks of fruit, add any other kind of fruit that you like in addition to the mashed banana or vegetable puree. Frozen raspberries or blueberries work well.

Other variations: 1)Add cocoa powder & chocolate chips. 2)Use pureed pumpkin & warm spices like cinnamon, cardamom, nutmeg, etc. 3)Add fresh orange or lemon zest to any combination.

Mix the dry ingredients in a large mixing bowl. Mix the wet ingredients in another large jug or bowl, using anywhere from 3 cups to an entire 1/2 gallon of buttermilk. That may sound like a lot, but it depends on which texture you prefer. The dryer the batter the more bread-like the waffles will be. When the batter is more wet and runny the waffles come out crispier when hot, but will be floppy like crepes after they rest and cool. I say play around with it and find your own preference. Pour the wet ingredients into the flour mixture and combine well, but don't stir too long. Add the fruit & combine well. Ladle into a hot waffle maker & serve fresh and hot with real maple syrup or re-heat in a toaster oven later.

I use a round Cuisinart waffle maker with small shallow holes. If you have a Belgian style waffle maker with deep large holes, it is possible that this recipe won't work. That's hard for me to believe, but it has not been tested on any other kind of waffle maker.

Leftovers: This is my favorite part of the weekly waffle routine. I love to make waffle sandwiches with a spread of almond butter and Nutella, then add sliced banana and fresh berries. Fold it over and eat it like a taco or use a fork, whichever you prefer. It's delicious and filling.